This is a unique card that is a
little time consuming but I enjoyed making it and turned out very well.
I got this idea from Pinterest: Sue Campfield & Melinda Hart.
I combined both ideas and came up
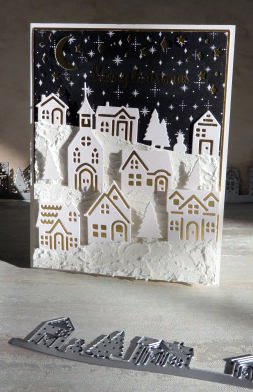
with this card using the Grove die set, Grassy Grove & Christmas Barn stamp sets. This was an intricate but beautiful card that I really enjoyed putting together. I love the baby wipe technique especially for leaves. I also love working with the paste when I want snow.
I started with 2 sheets of Very Vanilla cardstock, cut 11"x4.25" with scoring at 5.5". Place horizontally and using the scene die from the Grove die set centering it on the card that would be the front and cut it out. On the second card (inside) offset the die a little bit so when the cards are closed you can see some of the branches from the inside of the card (you can offset the die as much as you want to get the look you are after). It looks gives it a layer woods look. Also to get the inside card to close you need to cut <1/8" off the inside card so it closes properly (you may want to do this before you die cut the inside).


You can overlap your stamping to get the look you want. Just start light because you can always go darker or heavier but you can't go back. You cover both the outside card and then the inside card. Just keep them separate so you do the right sides.
Then color the branches using Early Expresso marker - covering what you think are branches or what looks right to you. It is difficult with the leaves stamped to figure out what are branches. Doesn't matter if you miss some because they will blend it with the leaves.
Then cut about 1.25'x5.5" strips: 1 of Snowy White Velvet Sheets, 2 Very Vanilla Cardstock, & 1 of either Basic White Cardstock or any plain white cardstock.
I started with the Basic White/plain white cardstock strip by cutting a way on one long side to match the season patter of the die cut on the card. You will then use this strip to cut out the Snowy White Velvet strip to match the same shape, so when the cards close they cover each other. You then take 1 Very vanilla strip cutting it to mirror the Basic White/plain white cardstock for the front part of the card. Take the 2nd Very Vanilla strip cutting it to mirror the Snowy White Velvet strip for the inside part of the card.
Take the two Very Vanilla strips and adhere to either the inside of the front part of the card and do the same to the other Very Vanilla strip to the inside of the inside card piece. Then Adhere the Snowy White Velvet strip to the outside of the inside card piece covering up the Very Vanilla Strip so it covers all of the Vanilla stip. Adhere the Basic White/Plain cardstock strip on the front of the front card piece covering up the Very Vanilla strip. (See the below pictures to get idea of how it will look)
Then you want to put some shimmery paste in a dish mixing in drops of White Ink Refill to get the white color. Otherwise it will be a yellowish color. Add as much as you need to get the color you want. Then place your front card piece flat on Silicone mat/anything that will wipe off. Apply small amount of past covering up the Cardstock giving it a little bit of a wave when you apply. Try to limit what you get on the branches and other part of the card - wipe off right away if you do. Then you will use the heat gun gently to dry the paste somewhat - do not over heat/dry. Set aside and work on rest of the card. I did several cards at a time and set them aside. I found that it looks better when the heat gun is used then if you let it dry on its own which takes forever. For the very inside of the card. Cut a Tahitian
Tide into 4"x5 3/8". Use the blending brush and brush white ink over the sheet to get the cloudy/snowy look you want. Set aside to dry and cut out the deer from Soft Suede Cardstock using the Grove dies. Also cut a 1/2"x5 3/8" Snowy White Velvet strip cutting into a wave to somewhat match the inside flap of the card (you want it to be smaller and hide when it is closed). Then adhere the strip to the dried Tahitian Tide Sheet.
Use the emboss buddy on the dry Tahitian Tide piece where you are going to put your sayings - brushing off excess.
Then you want to use your Stamparatus. Stamp both sayings in Real Red Ink (line up the main saying to show through both die cuts), keeping same place wipe off then ink with versa mark and put right on top of the Real Red Ink saying. It is important that you do this right after the other so the card doesn't move and the inks line up. Then sprinkle on Clear Embossing powder, knocking off excess, and heat with heat gun. You can glue the deer down lining up through the pieces so they show where you want or you can do that last.
You should have 3 separate pieces.
You then have to adhere the pieces together. I adhered the outside card
onto the inside of the card then put the saying piece centered onto the inside card piece - you want a little border to make it stand out.
Then Fold the cards over and you have your completed card. It fits in a standard envelope. It is time consuming but it does look beautiful. I can't wait for my family to get theirs this Christmas.
Please take a look at my Stampin Up Website if you are interested in any product that was used in this card. Please also take a look at the above blogs to see where I came up with this idea.
SUPPLIES USED
Paper: Very Vanilla, Tahitian
Tide, Snowy White 12x12, Soft Suede
Ink/Ink Refills: Real Red, Crushed Curry,
Pumpkin Pie, Versa Mark, White
Stamps: Christmas Barn, Grassy
Grove
Dies: Grove
Marker: Early Expresso
Paste: Shimmery White
Emboss Powder: Clear
Baby Wipes
Embossing Buddy
Heat Tool
Blending Brushes
Stamparatus
Silicone Craft Sheet


Lovely card x
ReplyDeleteLove what you did with the embossing paste for snow. I'm CASEing that for sure!
ReplyDelete